
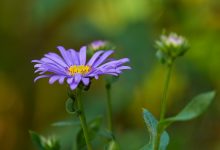
Dividing and transplanting asters is an essential task for ensuring the healthy growth and abundant blooms of these beautiful flowers. By following a step-by-step process, you can successfully divide and transplant asters without causing damage to the plants. This article will guide you through the necessary steps and techniques to divide and transplant asters effectively.
Dividing asters is crucial to promote healthier growth and prevent overcrowding. By dividing the aster clumps, you allow each plant to have enough space and resources to thrive. This process also helps rejuvenate older plants and encourages the development of new shoots.
Before you start dividing and transplanting asters, it’s important to choose the right time. The optimal time of year for this task is in early spring or fall when the plants are not actively blooming. This ensures that the asters have enough time to establish themselves in their new locations before the next growing season.
To prepare the soil for transplanting asters, you need to follow a few essential steps. Start by clearing the area of any weeds or debris. Then, loosen the soil using a garden fork or tiller to improve drainage and aeration. Adding organic matter, such as compost or well-rotted manure, can also enrich the soil and provide necessary nutrients for the asters.
When it comes to dividing the aster clumps, there are different tools and techniques you can use. Division by hand is suitable for smaller clumps, while a sharp garden knife can be used for larger clumps. It’s important to ensure that each division has a healthy root system and a sufficient number of shoots.
Transplanting the divided asters requires careful handling to minimize stress on the plants. Dig a hole in the new location that is slightly larger than the root ball of the division. Place the division in the hole, making sure the top of the root ball is level with the surrounding soil. Gently backfill the hole and firm the soil around the plant.
After transplanting, caring for the asters is essential for their successful establishment and long-term health. Adequate watering and mulching are crucial to provide the newly transplanted asters with enough moisture and insulation. Regular pruning and fertilizing will also promote healthy growth and abundant blooms.
In conclusion, dividing and transplanting asters is a valuable technique for ensuring the health and beauty of these flowers. By following the step-by-step process outlined in this article, you can divide and transplant asters with confidence and enjoy their vibrant blooms for years to come.
Choosing the Right Time
Choosing the right time to divide and transplant asters is crucial for ensuring the best results. The optimal time of year for this process depends on the specific variety of asters and your local climate. Generally, it is recommended to divide and transplant asters in the early spring or fall when the weather is cooler and the plants are dormant.
In the early spring, dividing and transplanting asters allows them to establish roots and settle into their new location before the hot summer months. This gives them a better chance of survival and promotes healthy growth. On the other hand, dividing and transplanting asters in the fall allows them to establish roots before the ground freezes, ensuring they are well-established and ready for growth in the following spring.
It is important to note that dividing and transplanting asters during their blooming period can cause stress to the plants and may impact their ability to produce abundant blooms. Therefore, it is best to avoid dividing and transplanting asters while they are in bloom. By choosing the right time to divide and transplant asters, you can set them up for success and enjoy beautiful blooms in your garden.
Preparing the Soil
Preparing the soil is a crucial step in ensuring the successful transplantation of asters. By taking the time to properly prepare the soil, you can create a favorable growing environment that promotes healthy growth and abundant blooms. Here are the essential steps to follow:
- 1. Clear the area: Start by clearing the area where you plan to transplant the asters. Remove any weeds, rocks, or debris that may hinder the growth of the plants.
- 2. Loosen the soil: Use a garden fork or a tiller to loosen the soil. This will improve drainage and allow the roots of the asters to penetrate the soil more easily.
- 3. Amend the soil: Test the soil pH and nutrient levels to determine if any amendments are needed. Add organic matter, such as compost or well-rotted manure, to improve the soil structure and fertility.
- 4. Provide drainage: Ensure that the soil has proper drainage by incorporating coarse sand or perlite into heavy clay soils. This will prevent waterlogging and root rot.
- 5. Level the soil: Smooth out the soil surface and create a level planting bed. This will help prevent water runoff and ensure even water distribution.
- 6. Mulch the soil: Apply a layer of organic mulch, such as straw or wood chips, to conserve moisture, suppress weeds, and regulate soil temperature.
By following these essential steps, you can prepare the soil effectively and create an optimal growing environment for your transplanted asters. Remember to tailor the soil preparation process to the specific needs of asters, as they prefer well-drained soil with a slightly acidic pH. With a well-prepared soil, your asters will have the best chance of thriving and producing beautiful blooms.
Dividing the Aster Clumps
Dividing the Aster Clumps is an essential step in ensuring the healthy growth and longevity of these beautiful flowers. By dividing asters into smaller clumps, we can promote healthier growth and prevent overcrowding, which can lead to stunted growth and reduced blooms. Let’s explore some techniques for dividing asters and creating a favorable growing environment.
1. Tools and Techniques: Before diving into the division process, it’s crucial to gather the necessary tools. A sharp garden knife or a garden fork will come in handy for separating the clumps. Make sure these tools are clean and sterilized to prevent the spread of diseases. Additionally, prepare a clean workspace with ample room to work comfortably.
2. Division Methods: There are different methods you can use to divide asters. One common technique is division by hand, where you gently pull apart the clumps, ensuring that each division has enough roots and shoots to thrive independently. Alternatively, you can use a sharp garden knife to carefully slice through the clumps, creating smaller sections. Whichever method you choose, handle the plants with care to avoid damaging the delicate root systems.
3. Timing: The best time to divide asters is in early spring or late summer when the plants are dormant or just starting to grow. Dividing them during these periods allows for easier root disturbance and faster establishment in their new locations.
4. Division Technique: Start by digging around the clump, ensuring you have enough space to work with. Gently lift the clump from the ground, taking care not to damage the roots. Once lifted, use your chosen tool to divide the clump into smaller sections, ensuring each section has a healthy root system and shoots. Be mindful of any diseased or damaged sections and discard them to prevent spreading any issues to the healthy divisions.
5. Replanting: After dividing the clumps, it’s time to transplant them into their new locations. Prepare the soil in the planting area by removing any weeds and loosening it with a garden fork. Dig a hole large enough to accommodate the divided clump, ensuring the roots have enough room to spread out. Place the clump in the hole, making sure the crown is level with the soil surface. Gently backfill the hole, firming the soil around the roots to eliminate air pockets. Finally, water the newly transplanted asters thoroughly to settle the soil and provide moisture for their initial growth.
By following these techniques for dividing asters, you can promote healthier growth, prevent overcrowding, and enjoy a vibrant display of blooms. Remember to be gentle with the plants and provide proper care after division to ensure their successful establishment in their new locations.
Tools and Techniques
When it comes to dividing asters, having the right tools and techniques is essential to ensure successful division without causing damage to the plants. Here are some tools and techniques you’ll need to effectively divide asters:
- Garden Fork: A sturdy garden fork is necessary to carefully lift the asters from the ground without damaging the roots.
- Garden Knife: A sharp garden knife will come in handy for cutting through the roots and dividing the clumps into smaller sections.
- Pruning Shears: Pruning shears are useful for trimming any dead or damaged foliage before dividing the asters.
- Watering Can: A watering can with a fine spray nozzle will help provide adequate moisture to the asters after division.
Now that you have the necessary tools, let’s explore some techniques for dividing asters without causing harm:
- Prepare the Soil: Before dividing the asters, make sure the soil is well-watered to ease the process of lifting the plants from the ground.
- Lift Carefully: Use the garden fork to gently lift the asters from the ground, taking care not to damage the roots.
- Divide the Clumps: Once lifted, carefully separate the clumps into smaller sections using the garden knife. Aim for at least three to five healthy shoots in each division.
- Trim and Replant: Trim any excess foliage and roots, and then replant the divided asters in their new locations, ensuring they are planted at the same depth as before.
By using the right tools and following these techniques, you can divide asters successfully and promote healthier growth without causing damage to the plants.
Dividing Methods
Dividing asters is an important step in ensuring their healthy growth and preventing overcrowding. There are several methods you can use to divide asters, depending on your preference and the tools you have available. Let’s explore some of the most common dividing methods:
1. Division by Hand: This method involves carefully pulling apart the clumps of asters with your hands. Start by digging up the entire clump and gently separating the individual plants. Be cautious not to damage the roots during this process.
2. Sharp Garden Knife: Another method is to use a sharp garden knife to divide the asters. Dig up the clump and then carefully slice through the root system using the knife. This method allows for more precision and control when dividing the plants.
3. Division with a Shovel: For larger clumps of asters, you may need to use a shovel to divide them. Dig around the clump, creating a trench, and then use the shovel to separate the clump into smaller sections. This method works well for asters with dense root systems.
Regardless of the method you choose, it’s important to ensure that each divided section has a healthy root system and some foliage. This will increase the chances of successful transplantation and promote the growth of new, vibrant asters in your garden.
Transplanting the Aster Clumps
Transplanting the Aster Clumps is a crucial step in ensuring the optimal growth and vitality of the divided asters. By following the proper techniques, you can give your asters the best chance to thrive in their new locations.
Before transplanting, it is important to choose the right spot for your asters. They prefer well-draining soil and full sun exposure. Prepare the new location by digging a hole that is slightly larger than the root ball of the asters. This will give the roots enough space to spread out and establish themselves.
Once the hole is prepared, gently remove the divided asters from their original location, taking care not to damage the roots. Place the clumps into the prepared hole, making sure that the top of the root ball is level with the soil surface. Fill in the hole with soil, firming it gently around the roots to eliminate any air pockets.
After transplanting, water the asters thoroughly to help settle the soil and provide moisture to the roots. Mulching around the base of the plants can help retain moisture and suppress weed growth. Keep the soil consistently moist, but not waterlogged, during the first few weeks after transplanting.
It is important to monitor the transplanted asters closely during the first few weeks to ensure they are adapting well to their new environment. If any signs of stress or wilting occur, provide additional water and consider providing some shade during the hottest part of the day.
Remember, transplanting can be a stressful process for plants, so it is important to give them time to adjust. With proper care and attention, your transplanted asters will soon establish themselves and reward you with vibrant blooms.
Caring for Transplanted Asters
Caring for transplanted asters is crucial to ensure their successful establishment and long-term health. By following a few essential care tips, you can help your transplanted asters thrive in their new location.
First and foremost, proper watering is key. After transplanting, asters may experience some shock and stress, so it’s important to provide them with adequate moisture. Water the newly transplanted asters deeply and regularly, ensuring that the soil is consistently moist but not waterlogged. Mulching around the base of the plants can help retain moisture and regulate soil temperature.
In addition to watering, pruning is another important aspect of caring for transplanted asters. Pruning helps promote bushier growth and encourages the development of more blooms. Remove any dead or damaged stems, as well as any weak or overcrowded growth. This will allow the plant to focus its energy on healthy growth and flower production.
Fertilizing is also beneficial for transplanted asters. Use a balanced, slow-release fertilizer to provide the necessary nutrients for healthy growth. Follow the instructions on the fertilizer packaging for the correct application rate and frequency. Avoid over-fertilizing, as this can lead to excessive foliage growth at the expense of flower production.
Lastly, keep an eye out for pests and diseases. Transplanted asters may be more vulnerable to certain pests and diseases, so regularly inspect the plants for any signs of infestation or damage. If necessary, take appropriate measures to control pests or treat diseases to ensure the long-term health of your asters.
By following these essential care tips, you can help your transplanted asters establish themselves successfully and thrive in their new environment. With proper care, you can enjoy beautiful, healthy asters with abundant blooms for years to come.
Watering and Mulching
Watering and mulching are crucial steps in ensuring the successful establishment and long-term health of newly transplanted asters. Proper watering techniques and the use of mulch can provide the necessary moisture and insulation that the plants need to thrive.
When it comes to watering, it’s important to strike a balance. Overwatering can lead to root rot and other diseases, while underwatering can cause the plants to dry out and wilt. The key is to provide enough moisture without drowning the roots.
One effective watering technique is to water deeply and less frequently. This encourages the roots to grow deeper into the soil, making the plants more resilient and better able to withstand dry periods. Aim to water the asters thoroughly, ensuring that the water reaches the root zone.
Mulching is another essential practice for newly transplanted asters. Mulch helps retain moisture in the soil, prevents weed growth, and regulates soil temperature. Organic mulches, such as straw, wood chips, or shredded leaves, are ideal for asters.
Apply a layer of mulch around the base of the plants, taking care not to pile it up against the stems. This will help keep the soil moist and insulated, protecting the roots from extreme temperatures and reducing water evaporation.
Overall, proper watering and mulching techniques are vital for the health and vitality of newly transplanted asters. By providing adequate moisture and insulation, you can ensure that your asters thrive in their new location.
Pruning and Fertilizing
Pruning and fertilizing are essential practices for promoting healthy growth and abundant blooms in transplanted asters. By properly pruning and fertilizing your asters, you can ensure their long-term health and vitality. Let’s explore the best practices for pruning and fertilizing your transplanted asters.
When it comes to pruning, it’s important to remove any dead or diseased stems to maintain the overall health of the plant. This not only improves the appearance of your asters but also prevents the spread of diseases. Additionally, pruning helps to shape the plant and encourage new growth. Use a sharp pair of pruning shears and make clean cuts just above a leaf node or bud.
In terms of fertilizing, asters benefit from a balanced fertilizer that is high in phosphorus. This nutrient promotes root development and flower production. Apply the fertilizer according to the manufacturer’s instructions, usually in early spring and again in mid-summer. Be careful not to over-fertilize, as this can lead to excessive foliage growth at the expense of blooms.
To summarize, pruning and fertilizing are crucial practices for maintaining the health and beauty of transplanted asters. By removing dead or diseased stems through proper pruning and providing the necessary nutrients through fertilization, you can ensure that your asters thrive and produce abundant blooms.
Frequently Asked Questions
- Q: When is the best time to divide and transplant asters?
A: The optimal time to divide and transplant asters is in early spring or fall when the plants are dormant. This allows them to establish their roots before the onset of extreme weather conditions.
- Q: How do I prepare the soil before transplanting asters?
A: Before transplanting asters, it’s important to prepare the soil by loosening it with a garden fork or tiller. Remove any weeds or debris, and amend the soil with organic matter such as compost to improve drainage and fertility.
- Q: What are the methods for dividing asters?
A: There are several methods for dividing asters. You can either divide them by hand, gently pulling apart the clumps, or use a sharp garden knife to cut through the rootball. Ensure each divided clump has sufficient roots and foliage for successful transplanting.
- Q: How should I transplant divided asters?
A: When transplanting divided asters, dig a hole slightly larger than the rootball of each clump. Place the clump in the hole, ensuring the crown is level with the soil surface. Backfill the hole with soil, firming it gently around the roots. Water thoroughly to settle the soil.
- Q: What care do transplanted asters require?
A: Transplanted asters require proper care to ensure their successful establishment. Water them regularly, especially during dry periods, and apply a layer of mulch around the plants to conserve moisture and suppress weeds. Additionally, prune the asters in early spring and fertilize them annually to promote healthy growth and abundant blooms.